
This is the 2nd part of the article: The art of website images. In this part we’ll walk you through the best practices how you should upload pictures to your WordPress site. If you are interested in how to make / choose images for your travel website, read the first part, too.
How to put the images on your WordPress site?
After you’ve got the final images from the photographer and/or downloaded them from a stock photo site, they are not ready yet to be uploaded to your website. We have 2 major problems with them:
- the sizes of the image files are too big for online use
- the file names don’t support your SEO strategy
Let’s see why these are so big issues and how we can fix them…
Problem no. 1: the size of the image file is too big
How and how many times have I seen this mistake on websites… After you downloaded or received your pictures, they usually have really big resolution. Like 5000×3000, or even bigger.
Unfortunately huge amount of megapixels is not a good idea online. An average laptop’s screen width is somewhere between 1280 and 1920 pixels. Mobile screens are even smaller. It means that even if you have super-high resolution pictures, e.g. 5000×3000 pixels, if your screen resolution is just 1024×768 it will limit the maximum viewable resolution of the picture to 1024×768.
So what’s the matter? The browser will resize the images to the screen size automatically, right?
Well, it may… But you’ll still be viewing a 5000×3000 image on a 1024×768 screen. And an 5000×3000 image’s file size is often 5-15 times bigger than a natively 1024×768 image.
Big file sizes make up 2 major problems:
- they take a lot of time to download, making your site slower (why is it an issue?)
- they use a lot of space on the server. E.g. if your web hosting plan allows you to use 5 Gigabytes of space, it can become very little soon if you upload hundreds of images of 5-10 MB
So the major principle here is to resize your images before you upload them to your website. There are tools like:
- Web Resizer – an online tool that helps optimizing your images
- Fotosizer – a batch image resize tool for Windows
- iResize – a similar tool for Mac
- Phatch – and a solution for Linux users
- Imsanity – a WordPress plugin that resizes your images when you upload them
that can help you in achieving this goal. When you are using a tool like these, make sure you’re not overwriting your original images, as you may need the full resolution versions for off-line use!
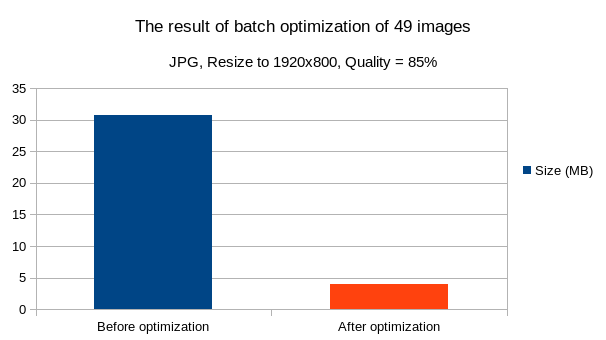
Here is the effect of optimizing 49 random photos. It saved us 87% of its original space.
What settings should I use?
I recommend you to use these settings when resizing your images:
- the resolution of the image should be the biggest possible resolution that can appear on your website. E.g. if the biggest image slot on your website is 1200×800 pixels then you should resize the images to at most this size (or you can try the 2400×1600 resolution if you want to fully support retina screens, too)
- for JPG files you can set the quality of the image file. For most of the photo images 85% quality is enough. Lowering the quality from 100-95% to 85% significantly reduces the size of the files.
As a rule of thumb, always use the JPG file format for photos and PNG for logos, icons, etc. This way you can easily reduce the file size from 3-10 MB to just 50-800 kBytes (the size depends on how detailed the picture is).
It’s usually a game with the numbers: you need to achieve as small as possible file sizes without significant losses in visible quality.
Problem no. 2: the file name in not SEO-friendly
When you receive your image files, they usually have file names like DCIM0017.JPG or Image00023.jpg or similar.
The main problem with these names is that Google Image Search takes into consideration the file name when searching for images. So if you rename DCIM0017.JPG to something that describes what is on the picture, like “grand-hotel-new-york-double-room.jpg” then you can expect that some people will find your hotel’s website based on the file name of the image.
Google Image Search example
It’s always a good idea to follow this naming convention:
- only small letters: web servers make difference between upper- and lowercase characters, so files will less likely get lost if you name them like “new-york.jpg” instead “New York.JPG”. Remember: the file names on the web server need to be readable in first place by web servers and search robots – and only in the second place by humans.
- hyphens instead of spaces: if you try to reach “new york.jpg” in your browser, it will display it like “new%20york.jpg”. Some web apps may find it difficult to read this format so it’s better to use hyphen (-) or maybe underscore (_) in these cases, like “new-york.jpg”.
- use only standard English characters: instead of “L’étolile.jpg” your file name should be just “letoile.jpg”
- avoid any characters that are not alphanumeric small letters or hyphens: this is in fact the rule how WordPress slugs are built up
- the file name should describe with a few important keywords what is on the picture: e.g. for the following picture the file name “blue-glass-vase.jpg” is a perfect choice.

Great, you’re now ready to upload your images to your WordPress site. If you need help with it, here is a quick tutorial.