The post Gutenberg: first impressions as a user appeared first on a-idea studio.
]]> Gutenberg will be the default editor of WordPress 5.0, which is likely to be released during the 2nd half of 2018 (maybe as early as in August, according to Matt Mullenweg’s announcement at WordCamp EU 2018).To be honest, up till this month Gutenberg has been a pretty grey area for me. I know, yes, that we all have to learn it as this tool is designated to be the future of WordPress. But I was always like “Hey, it doesn’t really look like something that’s gonna be released soon, so better not worry about it yet”.
However, Matt’s announcement has made it clear: the release date of WP 5.0 with Gutenberg is imminent. So I’d better dive into it as quickly as possible…
It was fortunate that I had an ongoing project that needed some page building stuff. So I thought I would try doing the job using Gutenberg — why not? I was thinking like if it’s going to be implemented in WordPress Core soon, then it must already be usable for an average page building task.
Well, first I was a bit afraid of using Gutenberg — seeing the really bad ratings it got in the WordPress Plugin repository. Fortunately, the situation is not that bad as how the commenters describe there (isn’t it interesting? When a new paradigm is coming into our world, most of the people are against it. Then, after a while they get used to it). However, it is obvious that Gutenberg is not a mature system yet: there is still a long way to go to make it perfect comfortably usable. But if we don’t really bother about some annoying bugs and its immaturity in usability, then I can say that Gutenberg is a promising system with great potentials.
I’m not going to write about what Gutenberg is and how to use it in this article. I will instead show you what my first impressions were:
I’m writing here about Gutenberg 3.4.0. Hopefully these child’s illnesses will be addressed in the future versions.
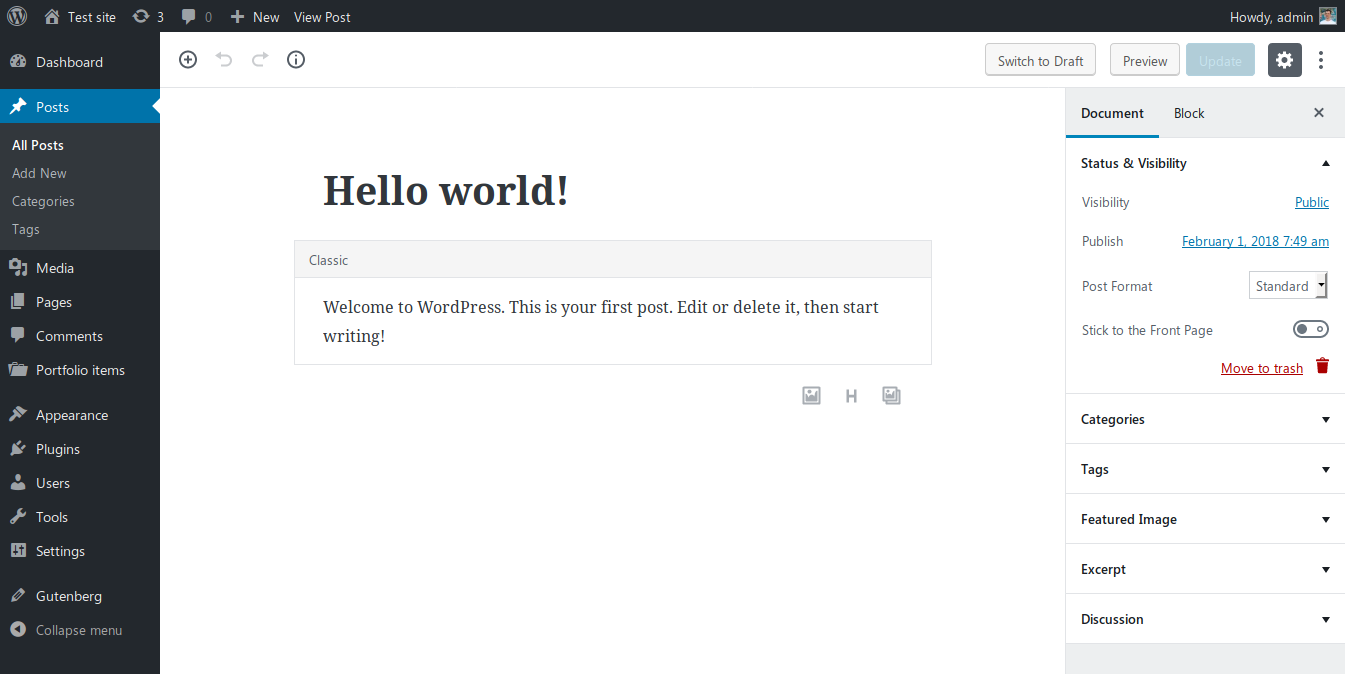
After I installed the Gutenberg plugin I went on to edit an existing post. Here is what I saw:
As you can see it, the old content is put inside a Classic block. In my opinion this is a great idea, because it keeps your previous formattings. This way it’s not likely that Gutenberg will ruin your previous contents and layouts (however, it may as there are millions of different WordPress setups out there). Also, I really like its look and feel, writing using Gutenberg has more like a feeling of “Creating”.
The new editor area is a lot narrower than in the old (Classic) one. This is comfortable as it’s easier to write if the 2 ends of a row are not miles away from each other. However, this narrowness was really annoying when I tried to make a multi-column layout.
I really like this feature. I can create multi-column sections that usually can only be found in premium page builders. However, it’s not yet as advanced as WP Bakery’s page builder nor as SiteOrigin or Elementor. Actually, it had a feeling like I’m playing around with a child’s Lego after using some real tools before.
While columns is a must-have tool in 2018, it feels that it’s still very much in the Beta stage in Gutenberg (at least the Gutenberg creators added a beta sign to it – thankfully). The main issues with the current setup are:
 Unlike the premium page builders which use either shortcodes or a complicated markup to build up page structures, Gutenberg keeps the markup as simple as possible. This is good because it gives your content higher level of portability when switching between themes.
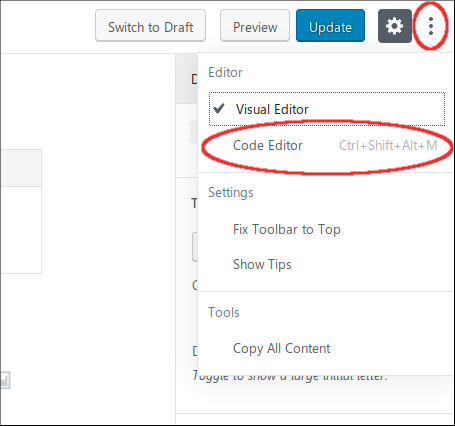
Instead of shortcodes, Gutenberg uses HTML comment tags to detect the special settings for the different blocks. You can view this markup if you click on the Three Dots (More) button in the top right corner of the editor and select the Code Editor option.
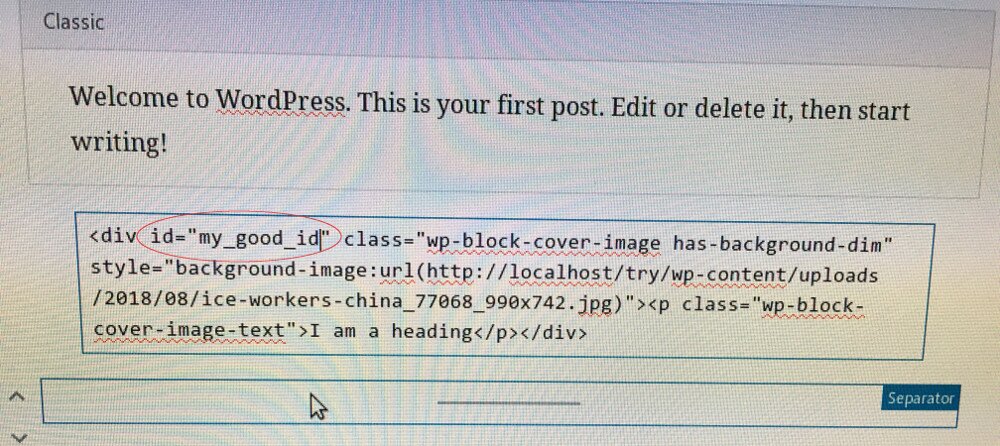
After this switch you can see the page’s actual markup, which is something like this:

As you can see, there are the wp:heading and the wp:paragraph HTML comments around the Gutenberg blocks, while the real markup is kept as simple as possible.
Gutenberg has a block for inserting good old shortcodes into your pages. However, I found this block type quite useless in its current state. It is a way better option to just create a custom HTML block and put your shortcode there, because that way you can encapsulate the shortcode in container elements — making it possible to add extra formatting or ID anchors to them.
Cover Image is a really great block type. Many modern web pages use the feature to have a wide image block with some heading text on them that separate the different sections of a page.
However, the current version in Gutenberg has 2 big shortcomings:
Fortunately if you are not satisfied with a block’s HTML output, you have the option to edit its output as HTML:

OK, let’s try to add an ID attribute to it in the old-fashioned way:
I though first that I was smart and managed to add my anchorable ID this way successfully. However, the next thing I saw was this – right after clicking outside the HTML block editor:

If I chose Convert to Blocks, my block was converted to a simple Paragraph block. So Gutenberg forgot that I was originally editing a Cover Image block. Moreover, it didn’t maintain my custom ID attribute, so it wasn’t a good option to convert back into a block.
The other option was to Keep it as HTML. In this case I lost the improved UI of the block. It’s not a good idea if I ever want to give the editing of this page into the hands of my client as he doesn’t know how to code HTML.
So if you want to add HTML ID attributes to your elements, most of the current Gutenberg blocks aren’t your friends.
Gutenberg was good enough to do what I wanted to achieve with it. But in some places I had to use very hacky solutions which were very far from what our end clients expect in terms of usability. And I’m not sure that I would be able to replicate all the page layouts with Gutenberg that I had built before with more mature page building tools.
For the current version I would give Gutenberg 3/5 points, but it can easily improve if the creators fix the following things:
Hopefully we’ll see great improvements in the next versions, because Gutenberg looks like an editor with great potentials. However, I have a feeling that we are going to switch back to the Classic Editor often after WordPress 5.0 is released…
Note: There is a poll embedded within this post, please visit the site to participate in this post's poll.The post Gutenberg: first impressions as a user appeared first on a-idea studio.
]]> https://a-idea.studio/2018/08/07/gutenberg-first-impressions/feed/ 3The post The art of website images (2): how to upload them to your WordPress site appeared first on a-idea studio.
]]> This is the 2nd part of the article: The art of website images. In this part we’ll walk you through the best practices how you should upload pictures to your WordPress site. If you are interested in how to make / choose images for your travel website, read the first part, too.How to put the images on your WordPress site?
After you’ve got the final images from the photographer and/or downloaded them from a stock photo site, they are not ready yet to be uploaded to your website. We have 2 major problems with them:
Let’s see why these are so big issues and how we can fix them…
How and how many times have I seen this mistake on websites… After you downloaded or received your pictures, they usually have really big resolution. Like 5000×3000, or even bigger.
Unfortunately huge amount of megapixels is not a good idea online. An average laptop’s screen width is somewhere between 1280 and 1920 pixels. Mobile screens are even smaller. It means that even if you have super-high resolution pictures, e.g. 5000×3000 pixels, if your screen resolution is just 1024×768 it will limit the maximum viewable resolution of the picture to 1024×768.
Well, it may… But you’ll still be viewing a 5000×3000 image on a 1024×768 screen. And an 5000×3000 image’s file size is often 5-15 times bigger than a natively 1024×768 image.
Big file sizes make up 2 major problems:
So the major principle here is to resize your images before you upload them to your website. There are tools like:
that can help you in achieving this goal. When you are using a tool like these, make sure you’re not overwriting your original images, as you may need the full resolution versions for off-line use!
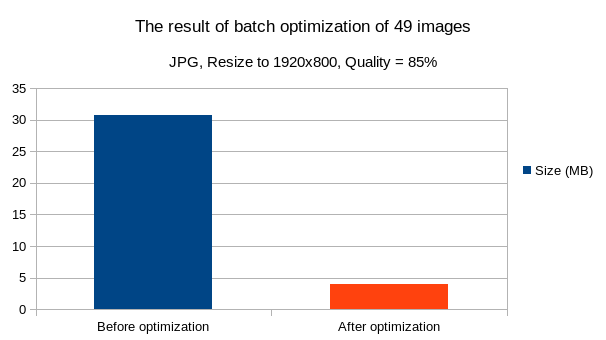
Here is the effect of optimizing 49 random photos. It saved us 87% of its original space.
I recommend you to use these settings when resizing your images:
As a rule of thumb, always use the JPG file format for photos and PNG for logos, icons, etc. This way you can easily reduce the file size from 3-10 MB to just 50-800 kBytes (the size depends on how detailed the picture is).
It’s usually a game with the numbers: you need to achieve as small as possible file sizes without significant losses in visible quality.
When you receive your image files, they usually have file names like DCIM0017.JPG or Image00023.jpg or similar.
The main problem with these names is that Google Image Search takes into consideration the file name when searching for images. So if you rename DCIM0017.JPG to something that describes what is on the picture, like “grand-hotel-new-york-double-room.jpg” then you can expect that some people will find your hotel’s website based on the file name of the image.
Google Image Search example
It’s always a good idea to follow this naming convention:

Great, you’re now ready to upload your images to your WordPress site. If you need help with it, here is a quick tutorial.
The post The art of website images (2): how to upload them to your WordPress site appeared first on a-idea studio.
]]> https://a-idea.studio/2017/02/13/art-website-images-2-upload/feed/ 0The post Make them feel like they are already there: the art of website images (part 1) appeared first on a-idea studio.
]]> This article has 2 parts. In the first (current) part we’ll cover how to make / choose images for your travel website. In the second part we’ll walk you through the best practice how you should upload these pictures to your WordPress site.If you are in the tourism business, it’s essential to have a good appearance. Just imagine why stewardesses and stewards are dressed in such an immaculate way on airplanes, why all employees of 5* hotels wear so clean and well-designed uniforms.
On travel websites – beside the site’s design – the pictures are the elements that represent this appearance. In this article we’ll learn how to make sure your imagery is of high quality on your website.
While on a charity organization’s website it can even be benefitial if they take their own photos (meaning that they don’t spend the organization’s money on unnecessary luxuries), for a travel website it’s almost a must-have to outsource their photoshootings to professional photographers (unless someone in the team is one of them).
The only exceptions are travel bloggers, as they obviously can’t carry their photographer everywhere they go (and it would obviously be too expensive and uncomfortable, too :)). However, good travel bloggers will eventually have to become a good photographers, too – as they need to take good quality pictures to sell their blogs to the readers (update: I’ve just found a great article about how to become a great travel photographer on Nomadic Matt’s blog).
It’s very fascinating, how photo editor software like Photoshop can improve the final appearance of the picture. They can add effects that make the difference between “well, this is a nice picture” and between “WOW! What amazing colors!”.
If you hire a professional, it usually takes him/her 1-2 days to take the photoshoots of your place (the time needed may vary based on how big your place is and what else – e.g. staff pictures – you want to get photographed). After that the photographer may spend weeks with the afterworks. But these final touches are very important to give your images their final shape and colors.
An example how a little bit of Photoshop can improve the image quality
In some cases you need other photos, too – not just those of your hotel or restaurant, etc. E.g. you may need photos of the nearby seaside or the buildings of the nearby city. If you don’t want your expensive photographer to spend a few more days taking photos of everything, you can buy stock photos online.
These stock photos are pictures taken by various photographers all around the world. They took the photos, added some after effects and uploaded them to different stock photo sites in the hope that lots of people will buy them. The prices of these stock photos vary from 0 to $50 based on their resolution, quality and intent of the author.
There are plenty of stock photo sites, my opinion is that the following sites offer the best quality images for their prices:
If you are on low budget, you can look around on free stock image sites. Here is a great collection of them (my personal favorite of them is pexels.com, I often use their pictures for illustrations of this blog).
But be careful, these free collections usually offer lower range of images to choose from and their images often have lower quality (it’s obvious: if the picture is good enough to get paid for, the author will ask some money for it). If you look around carefully, you can find real gems among the freebies, but it always takes some time…
It depends on the uniqueness of the photo. When a photo is needed of your rooms, your colleagues, etc. then you’ll obviously need to hire a photographer.
If it’s a well-known place, e.g. a picture of the Statue of Liberty or the Eiffel Tower, then you can safely use a good-quality stock image.
If you are taking photos of your hotel’s rooms or restaurant interior yourself, there is the danger that you shoot the photos from the bad angle, not showing all the potentials of the room.
If you need a good example what should be on the picture take a look at a professional estate agent’s website. They usually know where to stand (yes, they sometimes stand on a chair in the corner of the room to be able to lift the camera into the upper corner…) to take the best picture. And they often use special lens to show a bigger-than-natural angle that just looks awesome.
If you look around in your region, you can find lots of different photographers. Their prices will vary based on their knowledge, experience, professionalism and self-confidence.
Before you choose who you’d like to work together with, do your homework:
If you can’t decide whose example works are the best, ask some friends/relatives who have good eye for arts.
A photographer specialized in your segment can be a real gem
Also hiring a photographer specialized in hotels or real estate / restaurants & food / buildings / people (or what you need) is not a bad idea. Taking studio photos of people needs different settings than shooting outside or taking pictures of empty rooms.
In the 2nd part of this article we’ll go through the best practices how you should upload the images to your WordPress site.
The post Make them feel like they are already there: the art of website images (part 1) appeared first on a-idea studio.
]]> https://a-idea.studio/2017/02/06/art-website-images-1/feed/ 0The post 7 ways outdated content can harm your business appeared first on a-idea studio.
]]> If the content on your website is old and no longer 100% valid, it can really hurt your reputation and credibility. In today’s community-based economy reputation is everything. If people want to travel somewhere, they will probably check the hotels and restaurants on TripAdvisor, Facebook or in Google reviews. They will try to book places at best-ranked providers and will try to avoid businesses with bad reviews.In this article I’ll unfold 7 different aspects how outdated content on your website can harm your business.
Let’s say you want to book a room at a small summer guesthouse. Its website promotes on their website that a family room costs $80 for a night and they have a trampoline for the kids in the garden. Sounds like a good value for your money, so you call them to book.
Then the guy at the other end of the line tells you: “oh, sorry, our website i quite old, since then we’ve raised the price to $100/night”. It doesn’t sound too good, does it?
Let’s say, you book the room anyway, and when you arrive there you realize that the trampoline is nowhere. Your kids become sad because jumping on it is their favorite sport. When you ask the owner why it isn’t there, he just answers: “oh, it’s broken down since last year, and we didn’t have the chance yet to get it repaired”.
What kind of review would you leave for a place like this?
It’s not just about what assets the place has for what price. But it’s about what your visitors expect from you. They will expect from you what you offer to them on your website. The exact equipment for the exact prices – a crystal-clear offer. If they don’t get it they will think you lied to them.
It’s a very obvious one. Let’s say you see a website today that has a label on it:
“Last updated: 24th February, 2005″
You are right if you ask here the question: “Are they still in the business? Or is it just a dead site left alone on a far-away server?”
Most of the site’s visitors won’t call or email them to figure it out. They’ll just move on to the next similar website.

Hopefully your web content is not this old…
A very serious question. Today, when content marketing is everything, people tend to value your whole business based on your online presence. Even if your physical site is looked after every day, if your website doesn’t reflect it, people will doubt it.
If you publish new content frequently on your website, you’ll never have to worry about what to share on your social media channels. And Facebook fans, Twitter followers, etc. like to see regular content updates. The more content you post, the more likely someone will share it.
This is so-said in the world of marketing that an average person has to hear more than 9 times about a product before he/she buys it. It means that it has a very low possibility that they will order from you at the first sight.
If you update and share your new contents regularly, it’s more possible that they will reach these 9+ occasions sooner than later.
Yes, if there are 2 articles with the same value, Google will more likely rank the newer article higher in the search results list. It means more possible visitors for your website.
You’ll get less amount of emails and phone calls about the most obvious topics, like:
if you put all the relevant information on the website and keep it up-to-date. It will allow your team to focus more on sales and giving great service – instead of answering the same questions every hour.
Of course, visitors will ask you these questions even if you have the best FAQ page on Earth, but they will ask them less often. And it means more free time / capacity for you!
These are just 7 examples why content is the king in online marketing. You’ll not just raise the level of trust towards your business if you post new content and update your existing pages regularly – you’ll also more probably have more site visitors.
In 2011 I was a member of a team who managed a guesthouse and our only marketing source was online content marketing & SEO. Our building was almost always full of guests, however, it wasn’t the best place in town. So I can assure you, the principles I wrote about above do work – I’ve seen it myself…
The post 7 ways outdated content can harm your business appeared first on a-idea studio.
]]> https://a-idea.studio/2017/01/30/outdated-content-harm-business/feed/ 0